Porting a basic HLSL Shader
Preface
Original Source
New Vegas Reloaded is a great piece of software, which hooks into New Vegas' renderer and adds some new effects. Such as making many statics cast shadows, darkening shadows, adding AO for nice object shading (fake mini-shadows), rain puddles during rainy weather...And colour adjustment with HLSL shaders!
Unfortunately, it's not quite as pick-up-and-go as it is for ReShade, or ENBSeries. This is not out of laziness, but out of near two decades of work on/off by the community. It's not just throwing post processing on top, but doing low level engine stuff.
But that does not mean we can't add our own HLSL code!
We just got to modify the source code, add our own shader, and port the shader code from those other cool projects into NVR!
Sounds easy, right?
Absolutely not.
Which is why this tutorial is being made! Let's get started.
Requirements
We will need 4 tools:
We use Git to download the source code, Visual Studio to edit it, HLSL Tools to make editing the shader code easier, and Notepad++ to make editing the settings file easy. Sounds complex, but it's more just tedious than anything. So download and install those programs, and let's get going.
First things first, create a folder where we'll do all of our work. I just named mine _GitHub. Very creative, I know.
Now go into that folder, and right-click -> Git Bash Here -> Paste in the following when the command line appears:
git clone -b nightly https://github.com/mchaptel/TESReloaded10.git --recurse-submodules --remote-submodules
This will have created a folder called TESReloaded10 in the folder. Double click it, and you'll see something that looks like this:
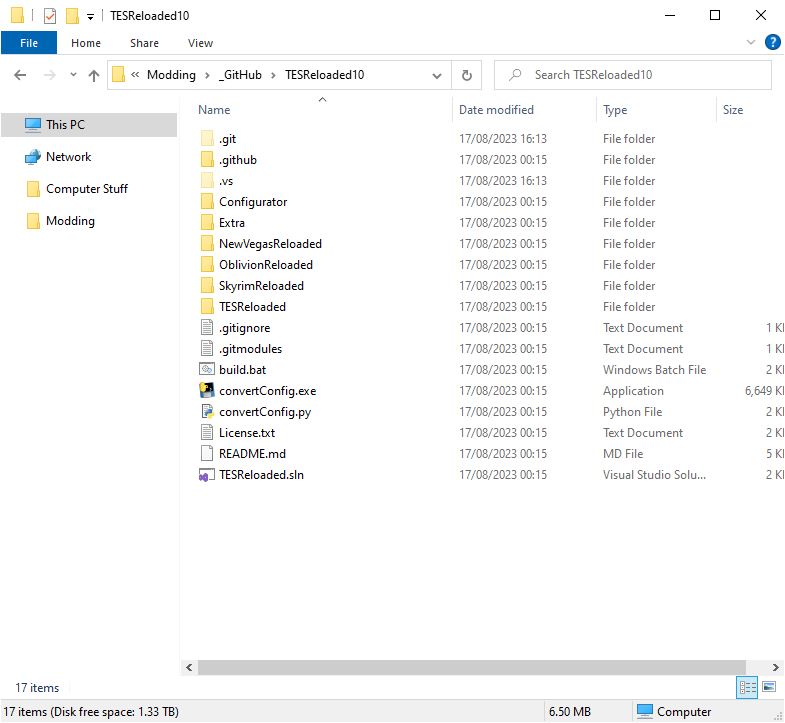
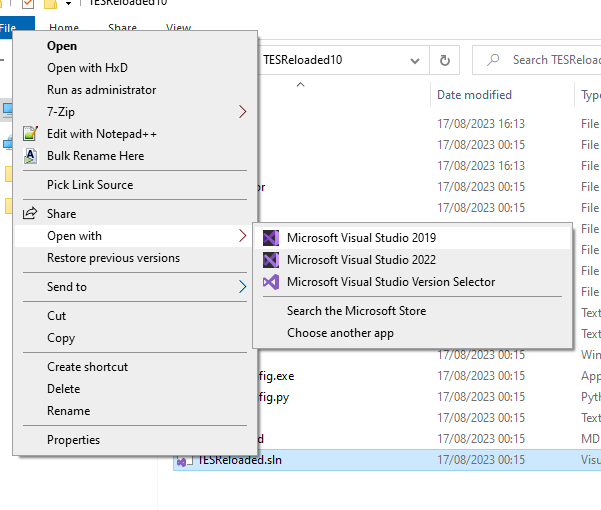
Right-click on TESReloaded.sln -> Open with -> Microsoft Visual Studio 2019.
Give it a second to load, and you'll see Visual Studio pop up and look like the following:
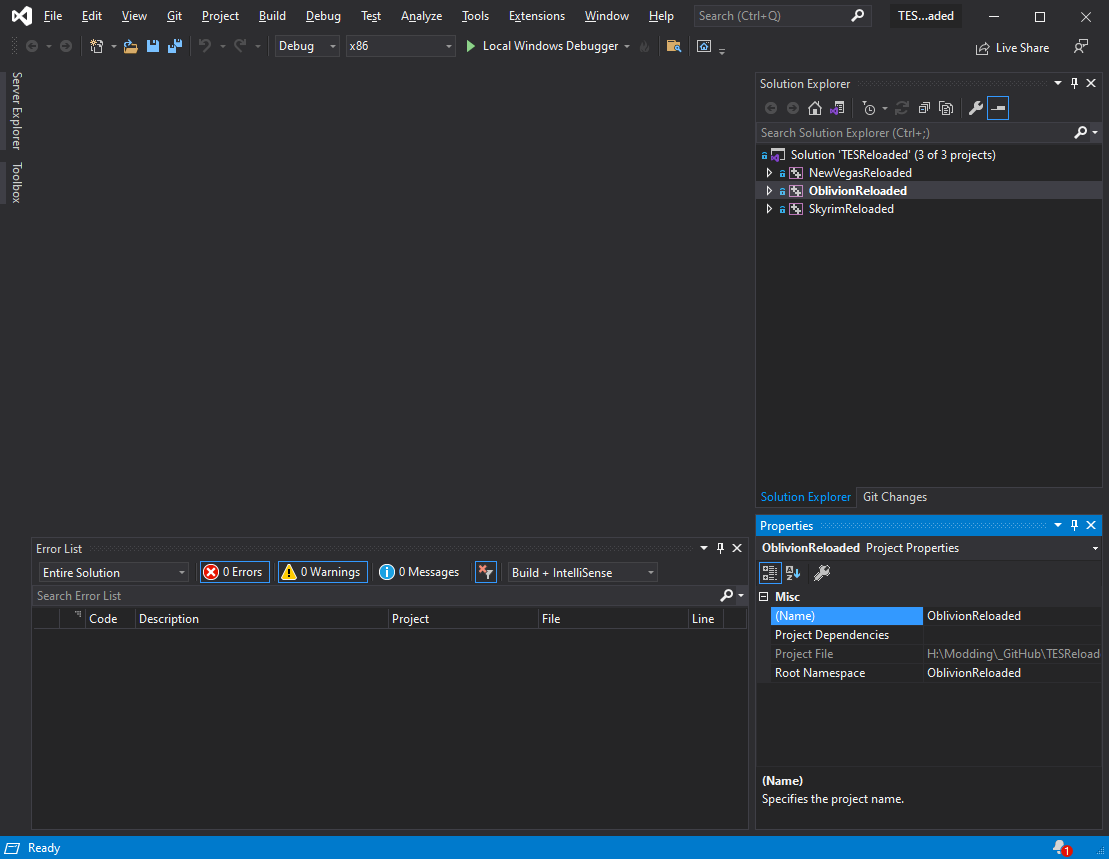
Congratulations, we've now ready to start doing code stuff! Unfortunately, we're now going to start doing code stuff.
Tutorial
For this tutorial, because I'm only interested in doing stuff for New Vegas, we will be making modifications to the NewVegasReloaded project. The process should be similar for the other two, but I'm no authority on that.
We have several things we need to do:
- Port the
HLSLparts that rely onReShade's framework, toNVR's - Create the menu settings that will be used to adjust the effect in-game
- Do a bit of C++ code (mostly ctrl+c ctrl+v shenanigans) to pass the game's data to the shader
This is all very daunting for people doing this for the first time. It was for me, and poor Mathieu C held my baby bird hands every step of the way. And this is my way of paying it forward.
We will be doing our work in ShaderManager.cpp, ShaderManager.h, and NewVegasReloaded.dll.defaults.toml. They function as follows:
ShaderManager.cpp-> Where we calculate the values given to our shader, and call for it to be renderedShaderManager.h-> Where we define the values, there's not much to do for thisNewVegasReloaded.dll.defaults.toml-> Where we define the settings for our shader
The first two can be found right inside Visual Studio, but the .toml file we will edit with Notepad++ (Windows' built in Notepad works, but it's clunky and yucky to use), and is located in TESReloaded10\Extra\NewVegasReloaded.dll.defaults.toml
Chapter 0: Fixing up the Visual Studio Solution
Now before we get into the dirty innards of the code, we need to do a little fixing: Adding the DirectX 9 package.
The reason this isn't bundled in properly after downloading from Github, is because it's a big lump of code that takes up a few hundred MB of space. Fortunately, it's easy for us to rectify this.
-
Go to
Tools -> NuGet Package Manager -> Manage NuGet Packages for Solution...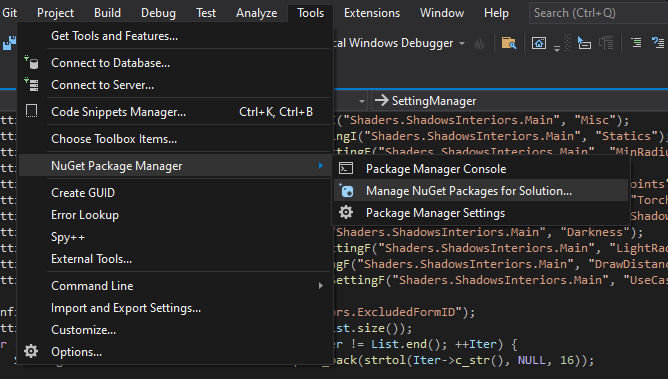
-
You will see the following appear, give it a moment to load if the window doesn't pop up right away.
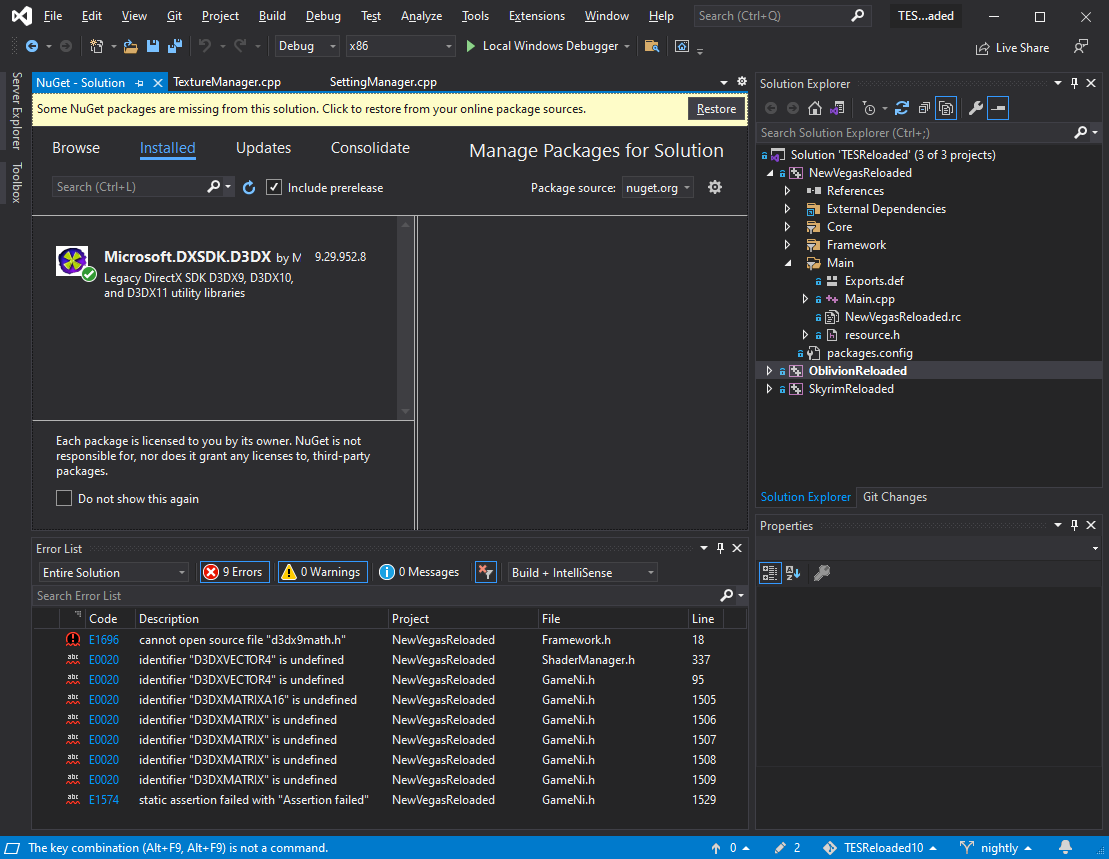
-
Click
Restoreat the right of the yellow banner -
Wait for
Visual Studioto finish fixing up the packages. If all went well, you'll see a nice green tick next to the icon of the Microsoft.DXSDK.D3DX package.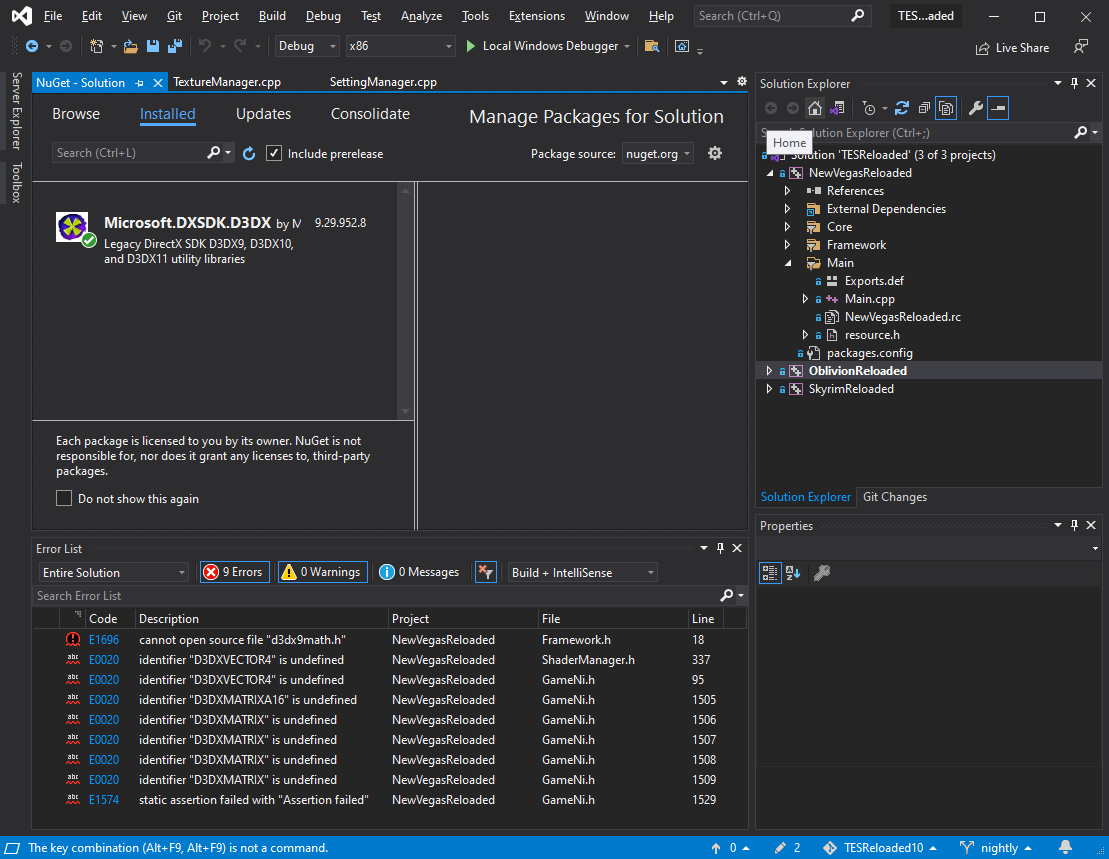 Then you are done fixing the compilation issues.
But wait! There's more!
We'll fix those icky warnings at the bottom of the screen.
 -
Right-click on
NewVegasReloaded->Properties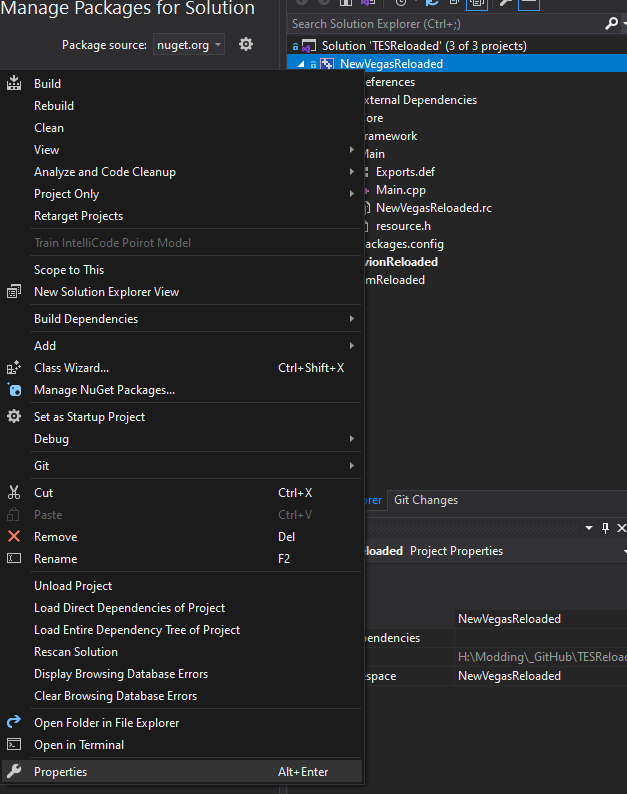
-
The
Property Pageswindow will pop up. Navigate toConfiguration Properties->VC++ Directories->General->Include Directories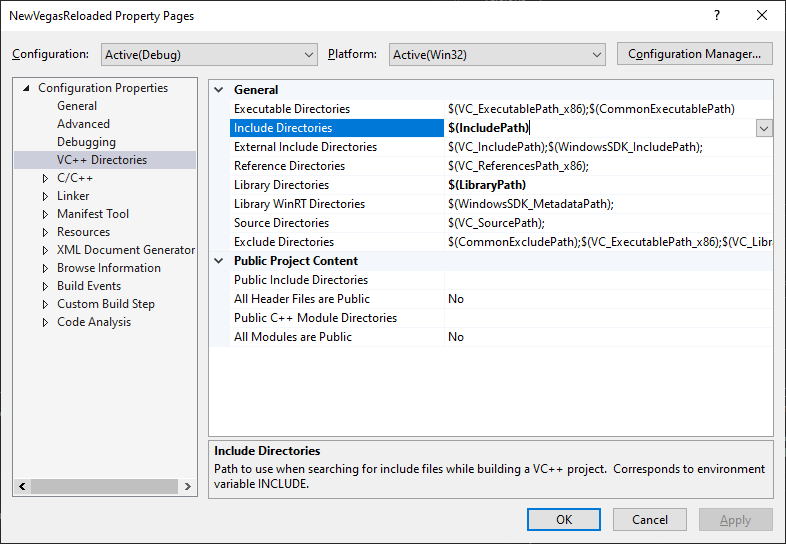
-
What we want to do here, is paste the relative path from the
.slnfile to where that DirectX SDK got put. Which is:packages\Microsoft.DXSDK.D3DX.9.29.952.8The result should be this:
$(IncludePath);packages\Microsoft.DXSDK.D3DX.9.29.952.8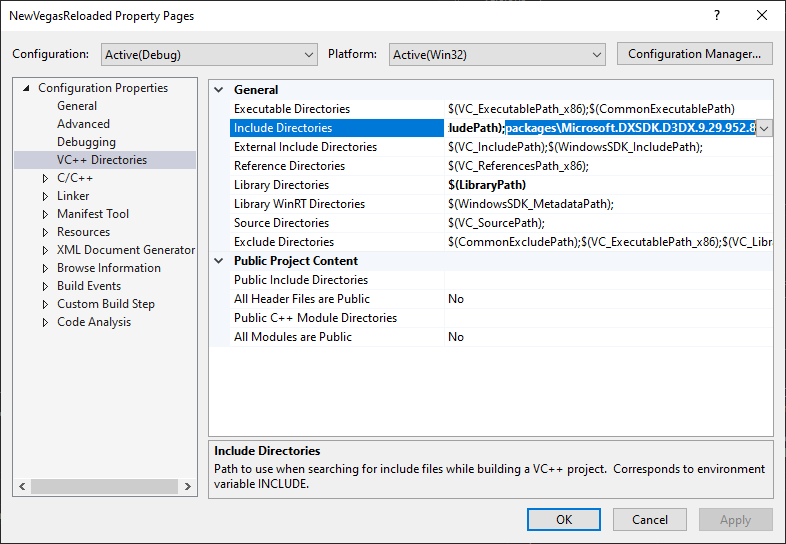
-
We've fixed the
Debugsettings, and we will do the same for the Release settings. Mainly because Debug is wonky for this project so we will be using Release. Yay. At the top left, change theConfigurationsetting toRelease. -
Make the same changes again to
Include Directories, then click OK.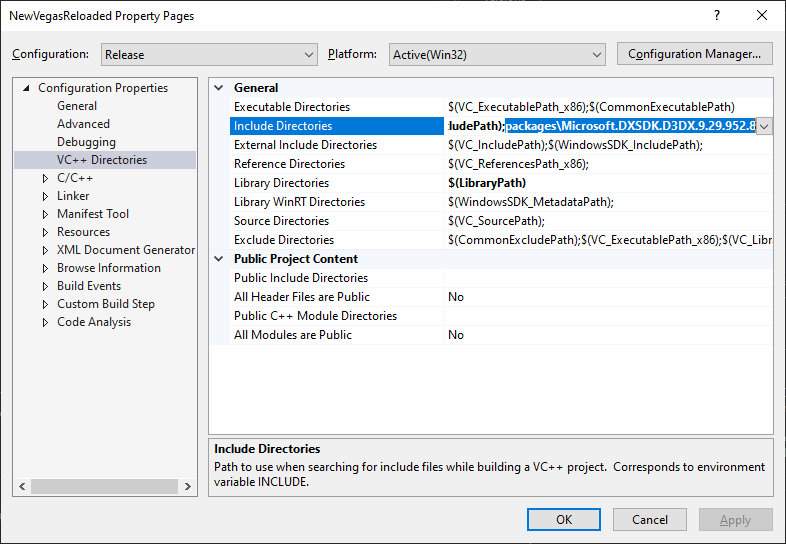 Bam! Fixed those DirectX errors. We got some others kicking about, but ignore those because, err, it works anyway?
Chapter 1: Understanding the shader we want to port
We got Visual Studio, we fixed the package so we can compile the code, now we need to understand what we're porting.
Let's do something basic. Remember SweetFX? That old grandaddy of ReShade that was all the rage back in the early Twenty Tenties? Yeah, that SweetFX. We'll port a basic, but rather nice shader called Lift Gamma Gain.
Here is the Github link for it, provided by 3an and CeeJay.dk: LiftGammaGain.fx
And here's the text of the shader, for posterity (link rot is a horrible reality!)
/**
 * Lift Gamma Gain version 1.1
 * by 3an and CeeJay.dk
 */

#include "ReShadeUI.fxh"

uniform float3 RGB_Lift < __UNIFORM_SLIDER_FLOAT3
    ui_min = 0.0; ui_max = 2.0;
    ui_label = "RGB Lift";
    ui_tooltip = "Adjust shadows for red, green and blue.";
> = float3(1.0, 1.0, 1.0);
uniform float3 RGB_Gamma < __UNIFORM_SLIDER_FLOAT3
    ui_min = 0.0; ui_max = 2.0;
    ui_label = "RGB Gamma";
    ui_tooltip = "Adjust midtones for red, green and blue.";
> = float3(1.0, 1.0, 1.0);
uniform float3 RGB_Gain < __UNIFORM_SLIDER_FLOAT3
    ui_min = 0.0; ui_max = 2.0;
    ui_label = "RGB Gain";
    ui_tooltip = "Adjust highlights for red, green and blue.";
> = float3(1.0, 1.0, 1.0);

#include "ReShade.fxh"

float3 LiftGammaGainPass(float4 position : SV_Position, float2 texcoord : TexCoord) : SV_Target
{
    float3 color = tex2D(ReShade::BackBuffer, texcoord).rgb;

    // -- Lift --
    color = color * (1.5 - 0.5 * RGB_Lift) + 0.5 * RGB_Lift - 0.5;
    color = saturate(color); // Is not strictly necessary, but does not cost performance

    // -- Gain --
    color *= RGB_Gain;

    // -- Gamma --
    color = pow(abs(color), 1.0 / RGB_Gamma);

    return saturate(color);
}


technique LiftGammaGain
{
    pass
    {
        VertexShader = PostProcessVS;
        PixelShader = LiftGammaGainPass;
    }
}
Now you'll want to copy that over to Notepad++ or Visual Code. I'll just use Notepad++ for this tutorial, as it's a dinky-tiny shader. But you definitely want VSCode when working with more complex stuff.
What we need to do, is the following:
- Remove the SweetFX-specific UI stuff
- Rename the variables to have NVR's
TESR_prefix - Edit the effect code to use the new variable names
First thing we'll do, is remove the SweetFX UI stuff, and prepare the variables for NVR's system instead. This is easy, just heavy on the jargon. Here's the snippet we'll be working with:
/**
 * Lift Gamma Gain version 1.1
 * by 3an and CeeJay.dk
 */

#include "ReShadeUI.fxh"

uniform float3 RGB_Lift < __UNIFORM_SLIDER_FLOAT3
    ui_min = 0.0; ui_max = 2.0;
    ui_label = "RGB Lift";
    ui_tooltip = "Adjust shadows for red, green and blue.";
> = float3(1.0, 1.0, 1.0);
uniform float3 RGB_Gamma < __UNIFORM_SLIDER_FLOAT3
    ui_min = 0.0; ui_max = 2.0;
    ui_label = "RGB Gamma";
    ui_tooltip = "Adjust midtones for red, green and blue.";
> = float3(1.0, 1.0, 1.0);
uniform float3 RGB_Gain < __UNIFORM_SLIDER_FLOAT3
    ui_min = 0.0; ui_max = 2.0;
    ui_label = "RGB Gain";
    ui_tooltip = "Adjust highlights for red, green and blue.";
> = float3(1.0, 1.0, 1.0);


#include "ReShade.fxh"

float3 LiftGammaGainPass(float4 position : SV_Position, float2 texcoord : TexCoord) : SV_Target
{
    float3 color = tex2D(ReShade::BackBuffer, texcoord).rgb;

    // -- Lift --
    color = color * (1.5 - 0.5 * RGB_Lift) + 0.5 * RGB_Lift - 0.5;
    color = saturate(color); // Is not strictly necessary, but does not cost performance

    // -- Gain --
    color *= RGB_Gain;

    // -- Gamma --
    color = pow(abs(color), 1.0 / RGB_Gamma);

    return saturate(color);
}


technique LiftGammaGain
{
    pass
    {
        VertexShader = PostProcessVS;
        PixelShader = LiftGammaGainPass;
    }
}
We got 3 float3 variables here. And what we'll do is condense them to 2 float4s, and 1 float. This looks icky to work with, which is why we'll create comments that explicitly state which each one does, so we don't get lost when working with the rest of this.
float4 TESR_LGG_LiftGamma; //.x = LiftRed, .y = LiftGreen, .z = LiftBlue, .w = GammaRed
float4 TESR_LGG_GammaGain; //.x = GammaGreen, .y = GammaBlue, .z = GainRed, .w = GainGreen
float TESR_LGG_Gain; //GainBlue
Notice the prefixes. The first one is very important, TESR_, as this is used by NewVegasReloaded to identify whether we are working with a variable from the game itself, or a variable we've created. Since we created this, prefix it with TESR_ And after that, we'll add an acronym of the shader we're porting in order to help keep track of it and also avoid any possible conflicts with other shader variables.
By using // we are able to create comments. Which are sections of text ignored by the compiler, so we can write whatever we want on the same line after them. And a great use for these is keeping notes. For multi line comments, use /at the beginning of the text/code you want to comment out, and then/ at the end of it. For example:
//My single line comment!
/*
//We can have comments inside multi-line comments too!
float3 MyVariableI'mNotUsingYet;
float3 += 1;
*/
After replacing those lines, next thing we see is this:
#include "ReShade.fxh"
In this case, we can remove that, as we're not working with ReShade's actual framework. Rather, we're converting the shader to use NVR's framework.
Next we see the following function being declared, which has some intimidating text in it:
float3 LiftGammaGainPass(float4 position : SV_Position, float2 texcoord : TexCoord) : SV_Target
We can just switch that to:
float3 GammaGain(VSOUT IN) : COLOR0
Isn't that lovely? Now for the code inside that function, what we need to do is swap out the old variable names for our (admittedly icky) variable names. Which involves a bit of cruft, and probably can be done better, but I don't get paid for this. I'll give the code before, and the code after.
Before:
    float3 color = tex2D(ReShade::BackBuffer, texcoord).rgb;

    // -- Lift --
    color = color * (1.5 - 0.5 * RGB_Lift) + 0.5 * RGB_Lift - 0.5;
    color = saturate(color); // Is not strictly necessary, but does not cost performance

    // -- Gain --
    color *= RGB_Gain;

    // -- Gamma --
    color = pow(abs(color), 1.0 / RGB_Gamma);

    return saturate(color);
}
After (with comments!):
float3 GammaGain(VSOUT IN) : COLOR0
{

    //Lift: Red = TESR_LGG_LiftGamma.x
    //Lift: Green = TESR_LGG_LiftGamma.y
    //Lift: Blue = TESR_LGG_LiftGamma.z
    color = color * (1.5 - 0.5 * ) + 0.5 * TESR_LGG_LiftGamma.xyz - 0.5;
    color = saturate(color);

    //Gain: Red = TESR_LGG_GammaGain.z
    //Gain: Green = TESR_LGG_GammaGain.w
    //Gain: Blue = TESR_LGG_Gain
    color *= float3(TESR_LGG_GammaGain.z, TESR_LGG_GammaGain.w, TESR_LGG_Gain);

    //Gamma: Red = TESR_LGG_LiftGamma.w,
    //Gamma: Green = TESR_LGG_GammaGain.x
    //Gamma: Blue = TESR_LGG_GammaGain.y
    color = pow(abs(color), 1.0 / float3(TESR_LGG_LiftGamma.w, TESR_LGG_GammaGain.x, TESR_LGG_GammaGain.y));

    return saturate(color);
}
After, without comments:
float3 GammaGain(VSOUT IN) : COLOR0
{
    color = color * (1.5 - 0.5 * ) + 0.5 * TESR_LGG_LiftGamma.xyz - 0.5;
    color = saturate(color);

    color *= float3(TESR_LGG_GammaGain.z, TESR_LGG_GammaGain.w, TESR_LGG_Gain);

    color = pow(abs(color), 1.0 / float3(TESR_LGG_LiftGamma.w, TESR_LGG_GammaGain.x, TESR_LGG_GammaGain.y));

    return saturate(color);
}
Now, for the last code block in the shader, we have this:
technique
{
    pass
    {
        VertexShader = compile vs_3_0 FrameVS();
        PixelShader  = compile ps_3_0 GammaGain();
    }
}
Luckily, since this is a simple shader, we don't have a mess of things here. And this is identical to what we need for NVR's shader. The important thing here is on this line:
PixelShader = compile ps_3_0 GammaGain();
That function call at the end is what actually gets our shader code to run. And it has to be the same name as our function. Remember the main code block?
float3 GammaGain(VSOUT IN) : COLOR0
{
...
}
That function we made, GammaGain() is what we need to use there. And we could rename it, so let's do that just to demonstrate. We'll rename it to SweetFXGammaGain().
float3 SweetFXGammaGain(VSOUT IN) : COLOR0
{
...
}

technique
{
    pass
    {
        VertexShader = compile vs_3_0 FrameVS();
        PixelShader  = compile ps_3_0 SweetFXGammaGain();
    }
}
After all is said and done, here is the shader with all our changes.
With comments:
/**
 * Lift Gamma Gain version 1.1
 * by 3an and CeeJay.dk
 */

float4 TESR_LGG_LiftGamma; //.x = LiftRed, .y = LiftGreen, .z = LiftBlue, .w = GammaRed
float4 TESR_LGG_GammaGain; //.x = GammaGreen, .y = GammaBlue, .z = GainRed, .w = GainGreen
float TESR_LGG_Gain; //GainBlue

float3 SweetFXGammaGain(VSOUT IN) : COLOR0
{

    //Lift: Red = TESR_LGG_LiftGamma.x
    //Lift: Green = TESR_LGG_LiftGamma.y
    //Lift: Blue = TESR_LGG_LiftGamma.z
    color = color * (1.5 - 0.5 * ) + 0.5 * TESR_LGG_LiftGamma.xyz - 0.5;
    color = saturate(color);

    //Gain: Red = TESR_LGG_GammaGain.z
    //Gain: Green = TESR_LGG_GammaGain.w
    //Gain: Blue = TESR_LGG_Gain
    color *= float3(TESR_LGG_GammaGain.z, TESR_LGG_GammaGain.w, TESR_LGG_Gain);

    //Gamma: Red = TESR_LGG_LiftGamma.w,
    //Gamma: Green = TESR_LGG_GammaGain.x
    //Gamma: Blue = TESR_LGG_GammaGain.y
    color = pow(abs(color), 1.0 / float3(TESR_LGG_LiftGamma.w, TESR_LGG_GammaGain.x, TESR_LGG_GammaGain.y));

    return saturate(color);
}

technique
{
    pass
    {
        VertexShader = compile vs_3_0 FrameVS();
        PixelShader  = compile ps_3_0 SweetFXGammaGain();
    }
}
Without comments:
/**
 * Lift Gamma Gain version 1.1
 * by 3an and CeeJay.dk
 */

float4 TESR_LGG_LiftGamma;
float4 TESR_LGG_GammaGain;
float TESR_LGG_Gain;

float3 SweetFXGammaGain(VSOUT IN) : COLOR0
{

    color = color * (1.5 - 0.5 * ) + 0.5 * TESR_LGG_LiftGamma.xyz - 0.5;
    color = saturate(color);

    color *= float3(TESR_LGG_GammaGain.z, TESR_LGG_GammaGain.w, TESR_LGG_Gain);

    color = pow(abs(color), 1.0 / float3(TESR_LGG_LiftGamma.w, TESR_LGG_GammaGain.x, TESR_LGG_GammaGain.y));

    return saturate(color);
}

technique
{
    pass
    {
        VertexShader = compile vs_3_0 FrameVS();
        PixelShader  = compile ps_3_0 SweetFXGammaGain();
    }
}
Chapter 2: Adding our shader and variables to NVR
Brilliant, we've ported the source code of the LiftGammaGain shader. Now, we will prepare the settings file first, and THEN add it to the framework. We'll create Day/Night/Interior variables, so we have some sweet, juicy time of day settings. Rather than, well, only having a single set of variables that is used at all times.
In Notepad++ (or vscode if you're pro, but we'll stick with Notepad++ for the sake of this tutorial), save the file in the TESReloaded10\Extra\Shaders\NewVegasReloaded\Effects folder, and call it SweetFXLiftGammaGain.fx.hlsl.
To do this, you will need to make sure file type is set toAll types (*.*). Like so:
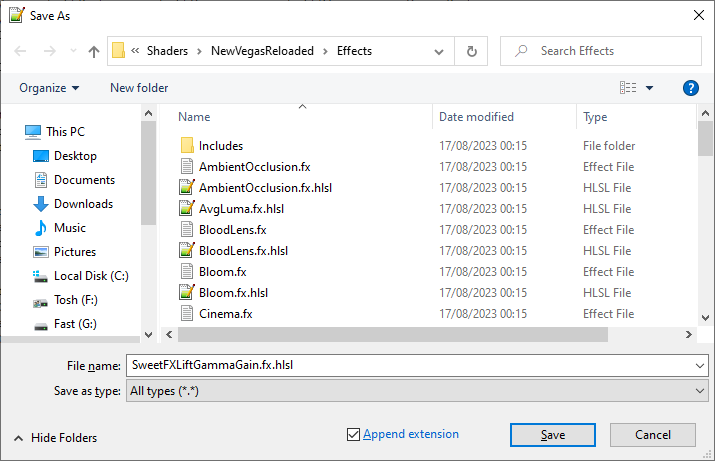
You will notice that there are two types of files here. .fx And .fx.hlsl.
The .fx.hlsl files contain the source code, which is what we've been working with in Notepad++. When we run NVR, the framework will compile the .fx.hlsl into a .fx file, which is what will actually be used to render our swanky SweetFX effect.
With that done, it's time to create our various settings. There are several things to do here.
-
Open the
NewVegasReloaded.dll.defaults.tomlfile in Visual Studio (can be done in Notepad++, but easier and nicer to have the text in the same program for easy copy-paste and comparing)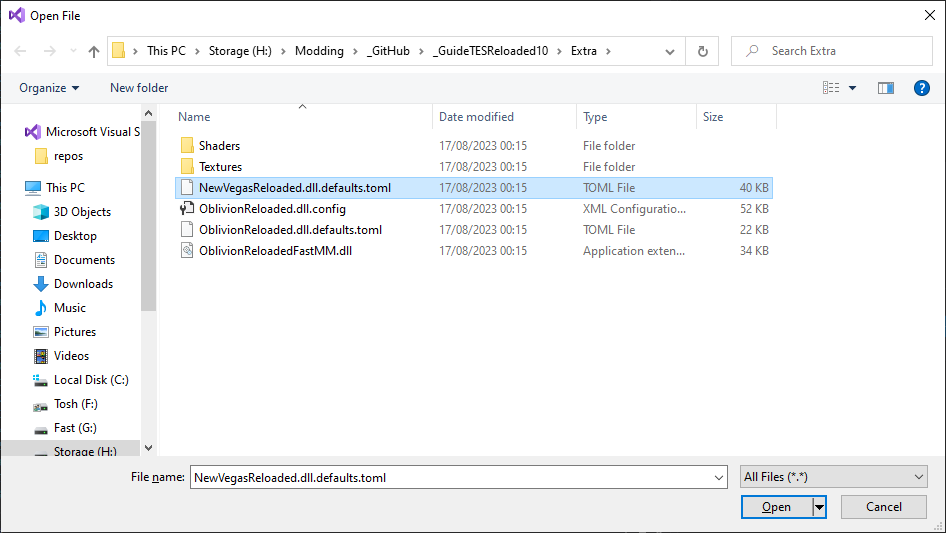
-
Create two new sections for our settings:
.Status, and.Main[_Shaders.SweetFXLiftGammaGain.Status]- This will contain only one setting, which is used to toggle the effect[_Shaders.SweetFXLiftGammaGain.Main]- This will contain the user-adjustable variables. We'll also add a comment to it, which is done with # (unlike //, which is for C++ and HLSL):
[_Shaders.SweetFXLiftGammaGain.Status]
Enabled = false #Port of SweetFX's LiftGammaGain. Allows adjusting shadows, midtones, and highlights

[_Shaders.SweetFXLiftGammaGain.Main] -
Add our settings to those sections
-
Define our shader's structure in
ShaderManager.h -
Fill the variables with data in
ShaderManager.cpp -
Pass the data to our shader in
ShaderManager.cpp
Now let's add our variables to the .toml (steps 2 & 3). Remember those comments we made in the .hlsl file?
float4 TESR_LGG_LiftGamma; //.x = LiftRed, .y = LiftGreen, .z = LiftBlue, .w = GammaRed
float4 TESR_LGG_GammaGain; //.x = GammaGreen, .y = GammaBlue, .z = GainRed, .w = GainGreen
float TESR_LGG_Gain; //GainBlue
Good thing we did, as we can clearly see the various settings we need. We'll copy-paste these, and also turn them into Day, Night, & Interior variants. So with a quick copy paste, adding the default values and comments:
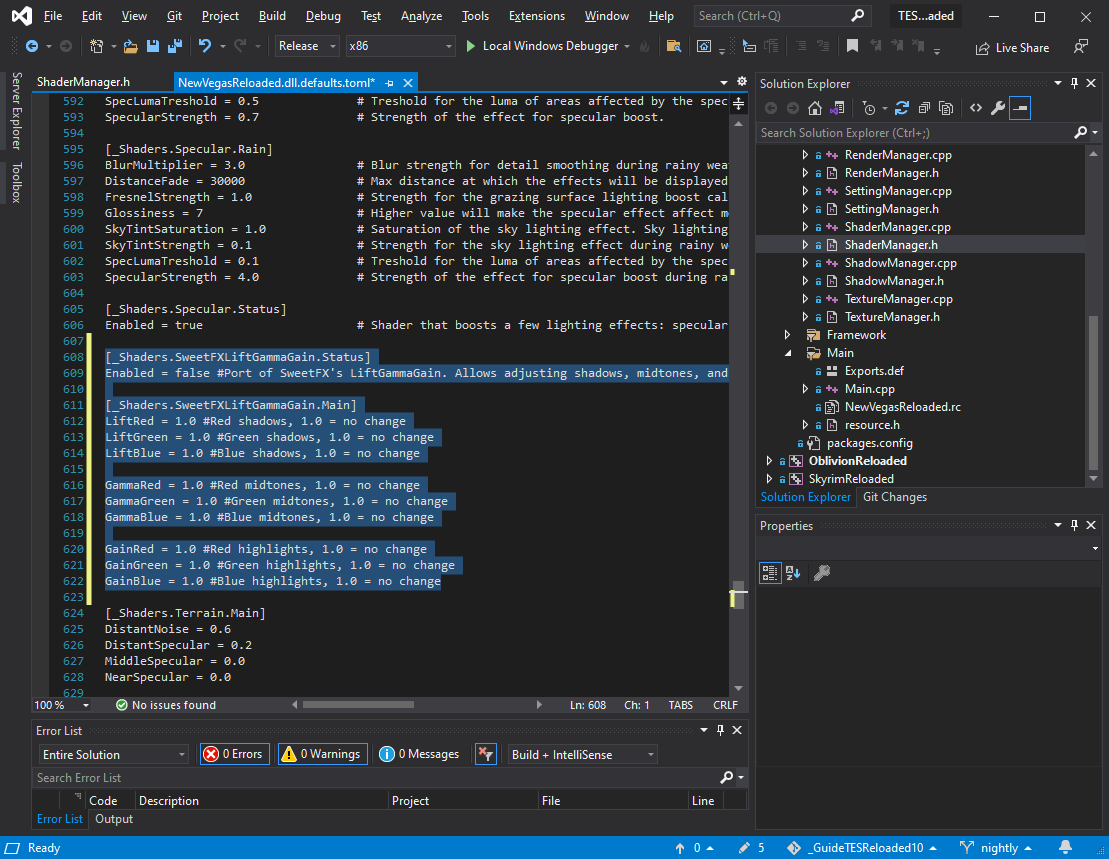
[_Shaders.SweetFXLiftGammaGain.Status]
Enabled = false #Port of SweetFX's LiftGammaGain. Allows adjusting shadows, midtones, and highlights

[_Shaders.SweetFXLiftGammaGain.Main]
LiftRed = 1.0 #Red shadows, 1.0 = no change
LiftGreen = 1.0 #Green shadows, 1.0 = no change
LiftBlue = 1.0 #Blue shadows, 1.0 = no change

GammaRed = 1.0 #Red midtones, 1.0 = no change
GammaGreen = 1.0 #Green midtones, 1.0 = no change
GammaBlue = 1.0 #Blue midtones, 1.0 = no change

GainRed = 1.0 #Red highlights, 1.0 = no change
GainGreen = 1.0 #Green highlights, 1.0 = no change
GainBlue = 1.0 #Blue highlights, 1.0 = no change
Great, we got the basic settings down. Now let's copy-paste the Main section twice, and rename those three sections to [_Shaders.SweetFXLiftGammaGain.Day], [_Shaders.SweetFXLiftGammaGain.Night], and [_Shaders.SweetFXLiftGammaGain.Interior].
Like so:
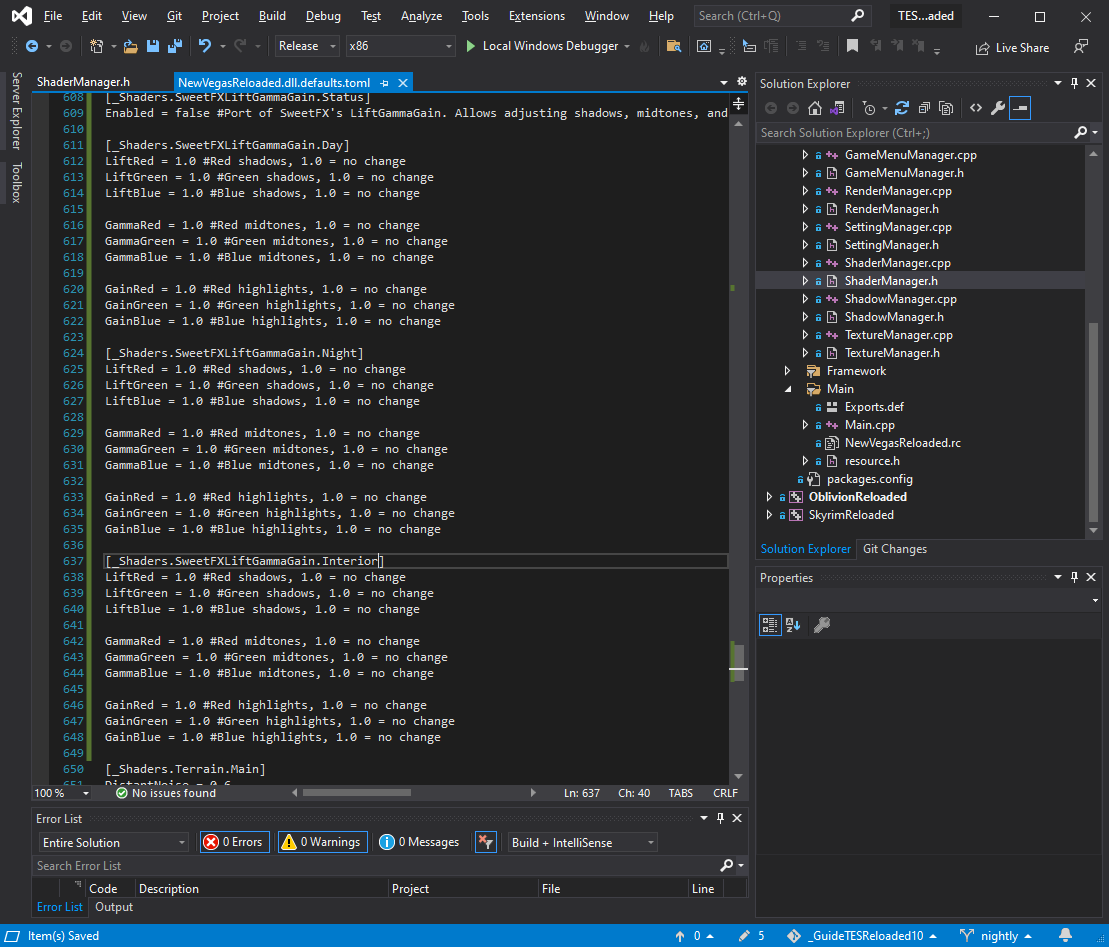
[_Shaders.SweetFXLiftGammaGain.Status]
Enabled = false #Port of SweetFX's LiftGammaGain. Allows adjusting shadows, midtones, and highlights

[_Shaders.SweetFXLiftGammaGain.Day]
LiftRed = 1.0 #Red shadows, 1.0 = no change
LiftGreen = 1.0 #Green shadows, 1.0 = no change
LiftBlue = 1.0 #Blue shadows, 1.0 = no change

GammaRed = 1.0 #Red midtones, 1.0 = no change
GammaGreen = 1.0 #Green midtones, 1.0 = no change
GammaBlue = 1.0 #Blue midtones, 1.0 = no change

GainRed = 1.0 #Red highlights, 1.0 = no change
GainGreen = 1.0 #Green highlights, 1.0 = no change
GainBlue = 1.0 #Blue highlights, 1.0 = no change

[_Shaders.SweetFXLiftGammaGain.Night]
LiftRed = 1.0 #Red shadows, 1.0 = no change
LiftGreen = 1.0 #Green shadows, 1.0 = no change
LiftBlue = 1.0 #Blue shadows, 1.0 = no change

GammaRed = 1.0 #Red midtones, 1.0 = no change
GammaGreen = 1.0 #Green midtones, 1.0 = no change
GammaBlue = 1.0 #Blue midtones, 1.0 = no change

GainRed = 1.0 #Red highlights, 1.0 = no change
GainGreen = 1.0 #Green highlights, 1.0 = no change
GainBlue = 1.0 #Blue highlights, 1.0 = no change

[_Shaders.SweetFXLiftGammaGain.Interior]
LiftRed = 1.0 #Red shadows, 1.0 = no change
LiftGreen = 1.0 #Green shadows, 1.0 = no change
LiftBlue = 1.0 #Blue shadows, 1.0 = no change

GammaRed = 1.0 #Red midtones, 1.0 = no change
GammaGreen = 1.0 #Green midtones, 1.0 = no change
GammaBlue = 1.0 #Blue midtones, 1.0 = no change

GainRed = 1.0 #Red highlights, 1.0 = no change
GainGreen = 1.0 #Green highlights, 1.0 = no change
GainBlue = 1.0 #Blue highlights, 1.0 = no change
Chapter 3: Adding our effect to NVR
Now we're going to be touching C++ code. Scary? Yes. Annoying to read? Also yes. That's how the language got its name in the first place. Just saying it is annoying.
We have several things to do here. Luckily, we can just copy paste from things nearby to do must of the work for us:
In ShaderManager.h:
- Create a new
structinsidestruct ShaderConstants{} - Declare a property inside
ShaderConstants{}at the end, which uses our new struct - Add a pointer to that Shader Constants property, inside
struct EffectsStruct{}
Or, to put it simply:
Create a new struct in ShaderConstants{} -> Declare it at the end of ShaderConstants{} -> Add it to EffectsStruct{}
Complicated? Not really. Do I know what I'm doing? Not really. Does it work? Yes. Is it jargon? Also yes. Now let's look at a picture for an example of what we're trying to create. We'll look at the Cinema effect, since it's one of the more basic effects in NVR:
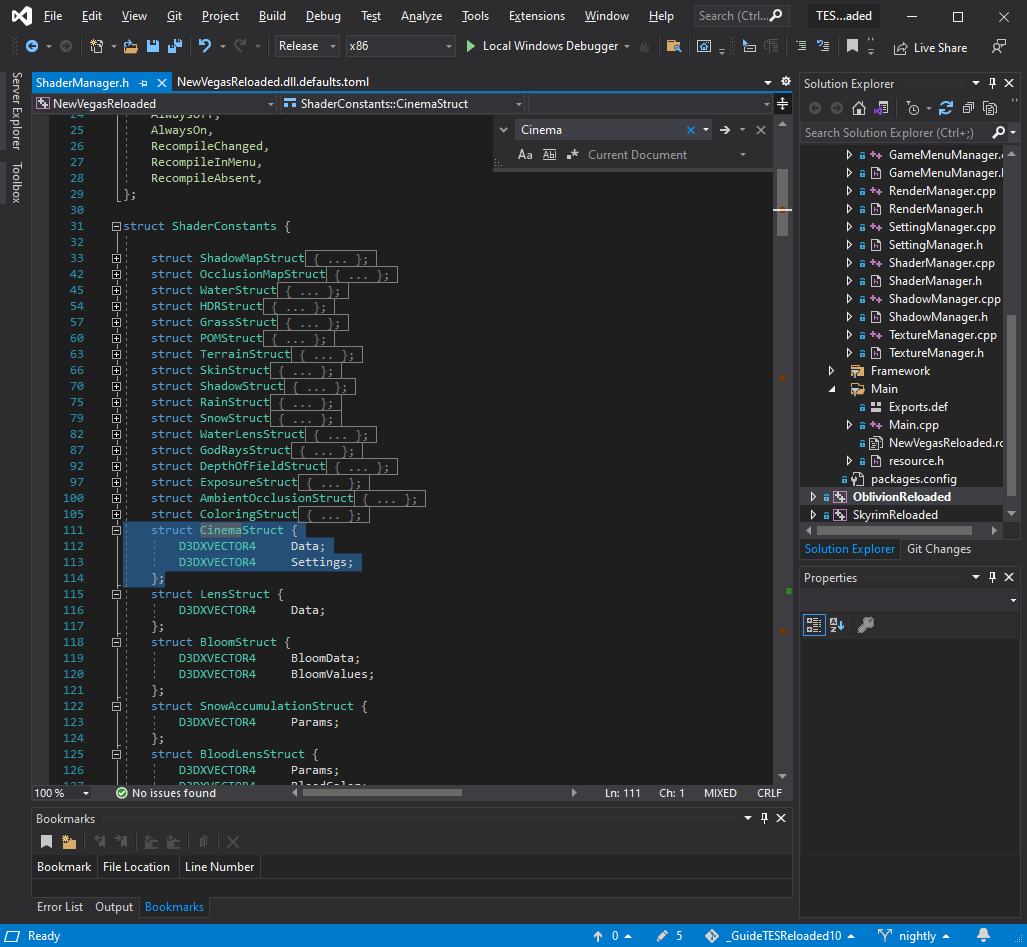
What we're looking at, is the C++ side of the shader's variables. D3DXVECTOR4 Looks very intimidating. But all it is, is the same thing as the float4 variables we made in the HLSL shader code. Just a different name that's all capitalized, which makes it extra scary. One thing to be aware of, is that we can either use a D3DXVECTOR4 (float4 in HLSL), or a float (err, float in HLSL). And nothing in between. If we have more than 1 value we want to store, then use a D3DXVECTOR4. Otherwise, use float.
In our shader, we made two float4's, and one float. Remember?
float4 TESR_LGG_LiftGamma; //.x = LiftRed, .y = LiftGreen, .z = LiftBlue, .w = GammaRed
float4 TESR_LGG_GammaGain; //.x = GammaGreen, .y = GammaBlue, .z = GainRed, .w = GainGreen
float TESR_LGG_Gain; //GainBlue
So if we do a bit of translation here, our struct should be:
struct LiftGammaGainStruct {
    D3DXVECTOR4  LiftGamma;
    D3DXVECTOR4  GammaGain;
    float Gain;
};
Now, let's think about where we want to place this. We could place it after bloom, which is how almost all ENB effects work. But since we're trying to make bright things brighter (for the sake of this tutorial), and darker things darker, let's put it after Ambient Occlusion but before the colour correction effects. So:
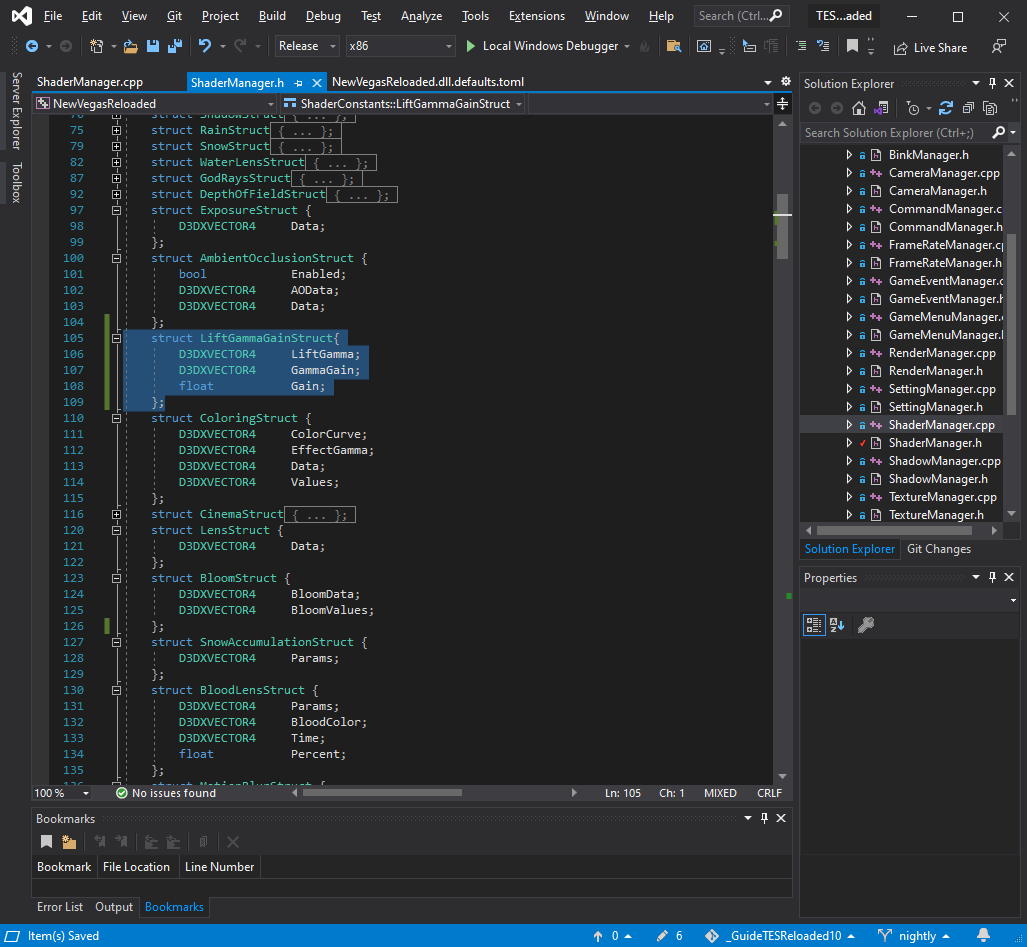
That'll do. Now scroll down, we now need to declare it in the end section of the struct. Let's look for the AmbientOcclusion effect again.
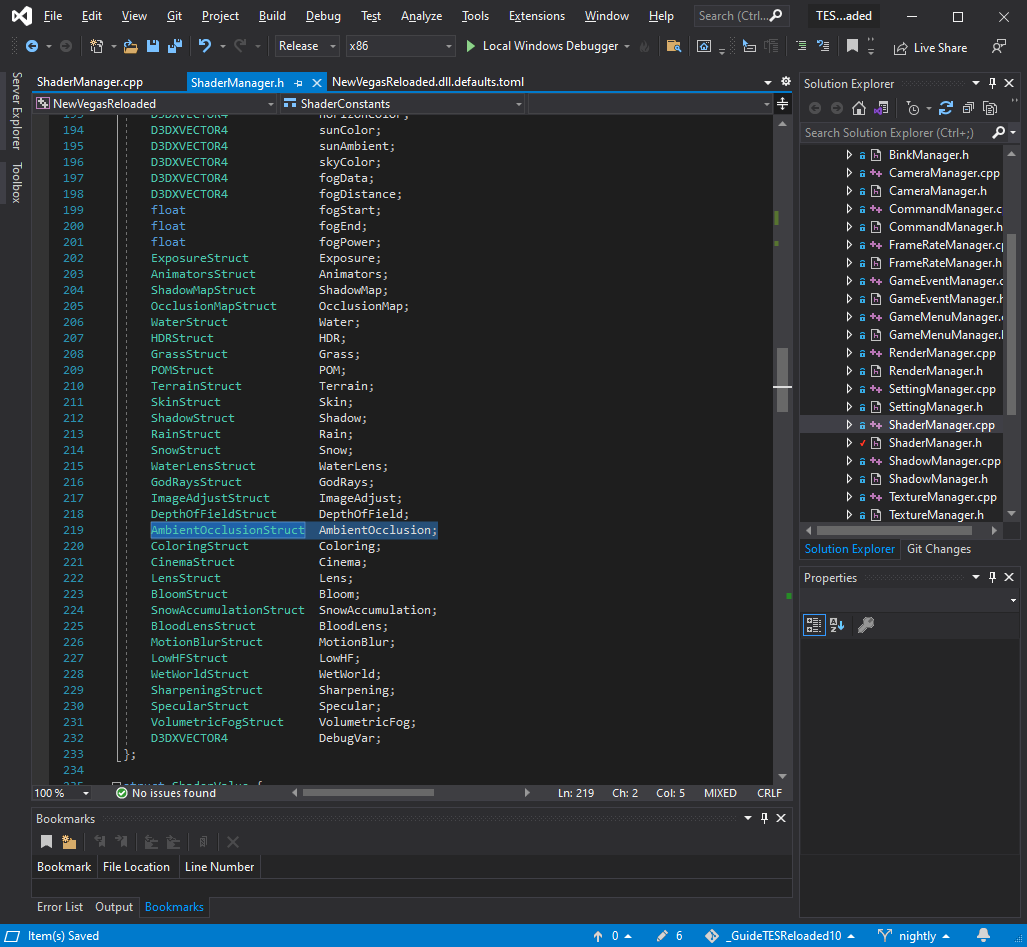
All we have to do, is declare the effect as a type of LiftGammaGainStruct. Why? Dunno, but it's what we gotta do for things to work. It means something in pro programmer patter, but that's not where we're at. So just chuck it in there, because we have to.
LiftGammaGainStruct LiftGammaGain;
And if you've done it right, it'll look like this:
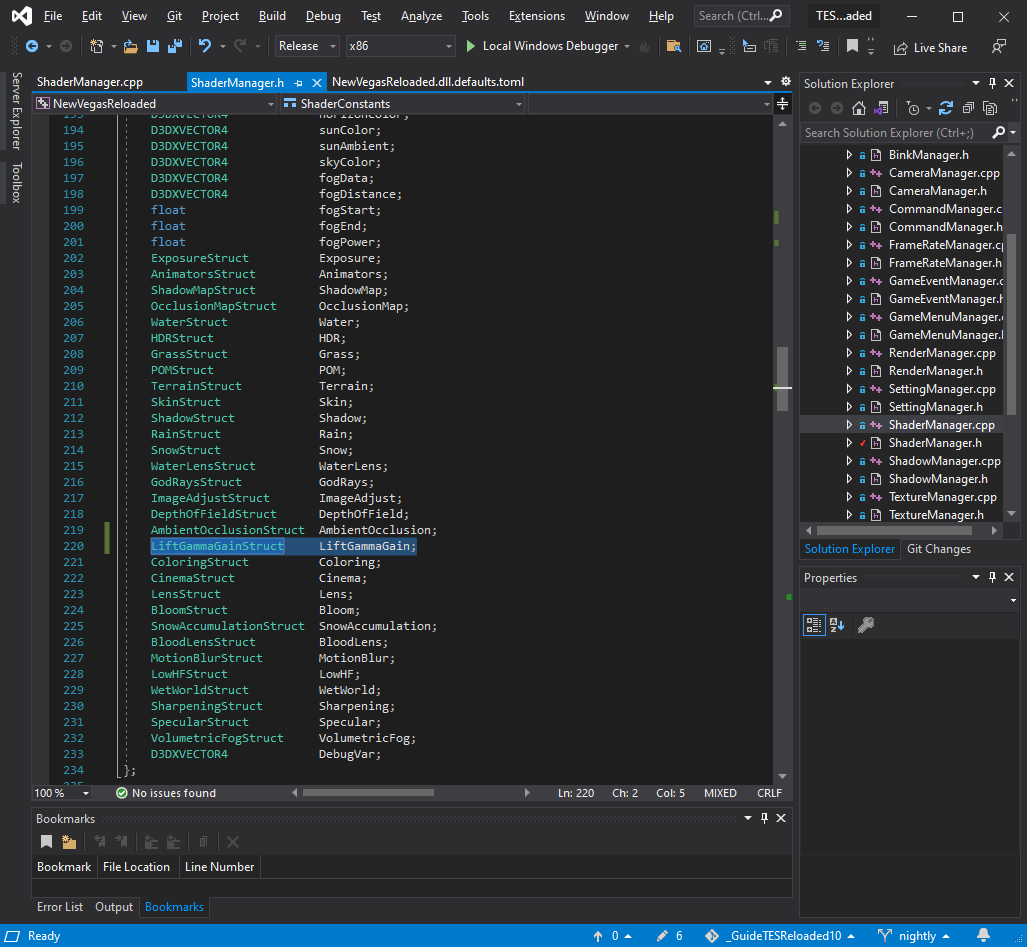
The scariest part here, is also very easy. Look for struct EffectsStruct and you'll find something that looks like this:
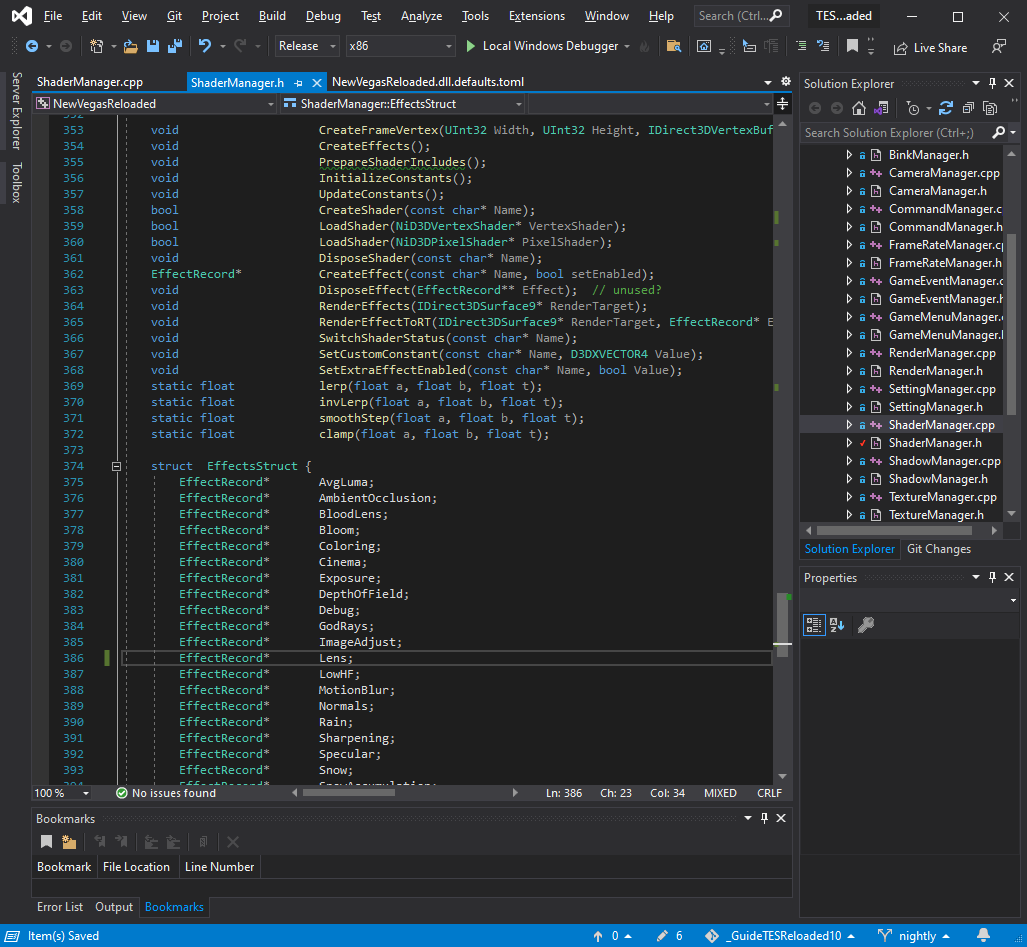
This is also a very easy thing. All we have to do, is add a pointer to the thing we just added before. Can you guess how it should look? If yes, look at the picture. If no, look at the picture. Keep in mind we must make sure it's alphabetically ordered.
EffectRecord* LiftGammaGain;
And there we go! That's the first half of the C++ stuff done!
Chapter 3.5: Editing ShaderManager.cpp
Now this is where it will get intimidating, as we'll be doing more than just declaring some properties and adding variables. We have to:
- Add if checks
- Is the player in the exterior or interior?
- Make lerp (blending) between day and night values
- Tell NVR to render our effect
The good news, is that we can do this simply in C++. The main issue you will see with C++ (and most programming languages, tbh), is the dogma of professional programmers. Unintuitive, short variable and function names, symbols all over the place, everything is lower case (dyslexia simulator for people without dyslexia)...
...Yeah not great. Luckily, we're not gonna do that. And NVR is far from the worst offender, so this could be much, much worse.
Before we get started, remember where we positioned the effect in ShaderManager.h. We put the effect immediately before the Bloom effect, and we'll be doing the same here.
Let's get started!
--
In ShaderManager.h, there are two functions we need to insert our code. The first is ShaderManager::UpdateConstants() {}.
First off, unless your shader does not have day/night nor interior/exterior, you want to make sure you don't put your code inside this function: if (TheSettingManager -> SettingsChanged)
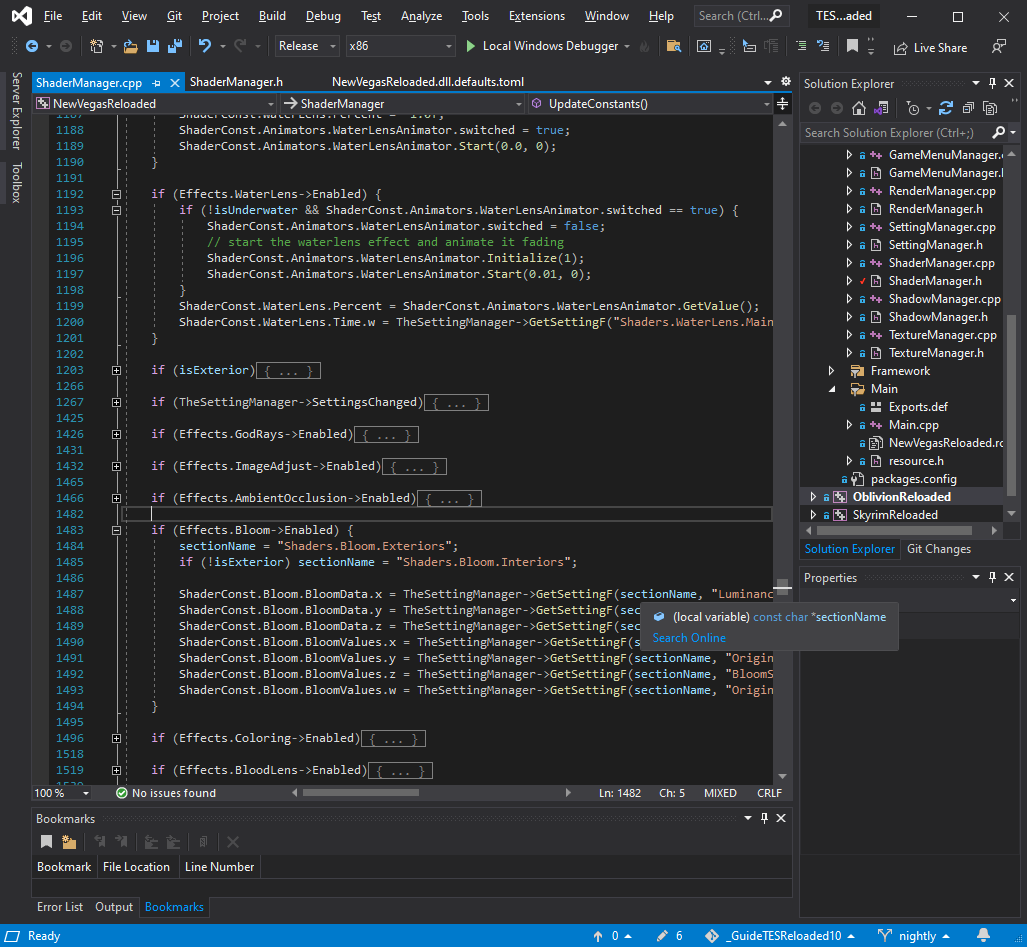
See where the bloom shader is placed? Let's make our if check right above it.
if (Effects.LiftGammaGain->Enabled)
{

}
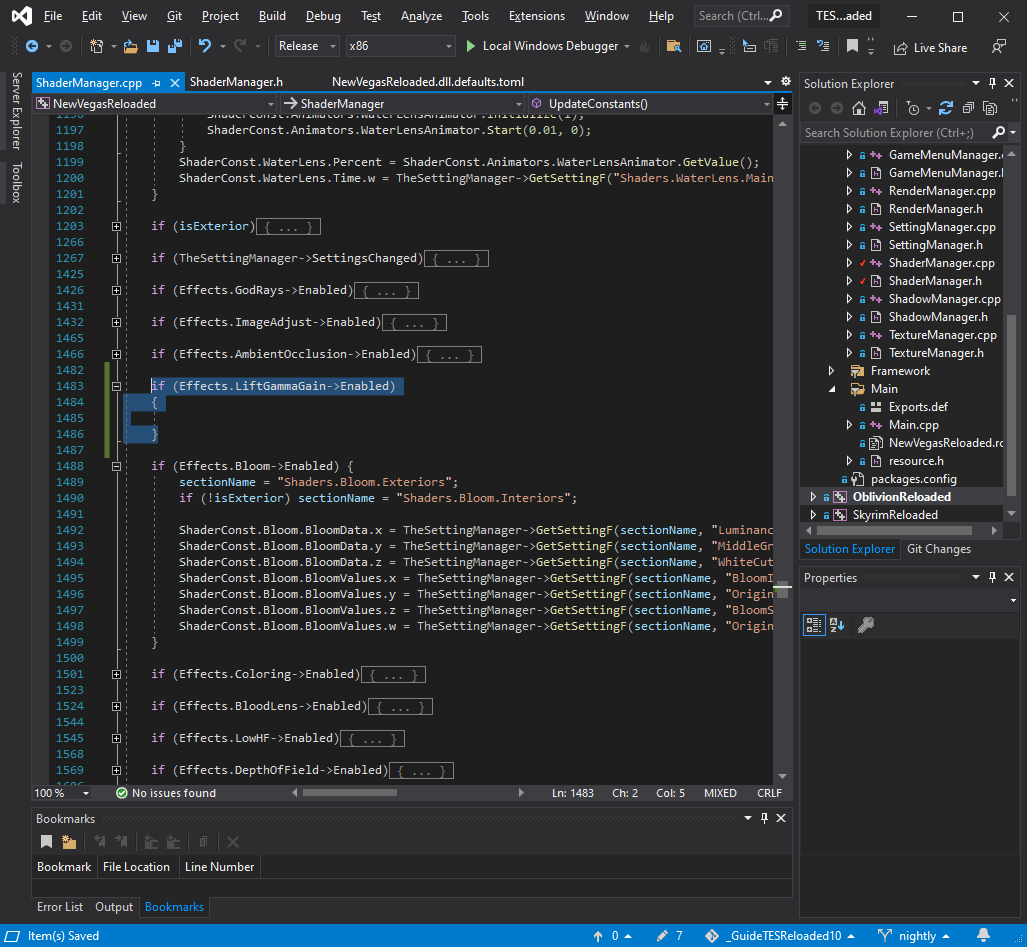
Why do we use -> Enabled? It's a C++ thing, I don't quite get it either, as all explanations are rife with jargon. Something to do with pointers, but who cares. We're here to shade, not to point.
This looks very intimidating. And it should, because it is. Let's break it down. Remember those three variables we made in the shader? Here's a refresher.
float4 TESR_LGG_LiftGamma; //.x = LiftRed, .y = LiftGreen, .z = LiftBlue, .w = GammaRed

float4 TESR_LGG_GammaGain; //.x = GammaGreen, .y = GammaBlue, .z = GainRed, .w = GainGreen

float TESR_LGG_Gain; //GainBlue
This is where we will finally be putting values into them, by getting them from the .toml file. Let's fill TESR_LGG_LiftGamma.x (LiftRed) first. Let's take a look at the .toml file:
For exteriors, we need to use the lerp() function, because we have two different values that blend into each other depending on the time of day. At noon, the value is 100% day. At midnight, the value is 100% night. If we're somewhere between those points, lerp() allows us to get the right value for the current time.
We also need to specify which category in the .toml we're using, and the value inside of it. As you can see in the above picture, we have three categories:
[Shaders.SweetFXLiftGammaGain.Day]
[Shaders.SweetFXLiftGammaGain.Night]
[Shaders.SweetFXLiftGammaGain.Interior]
And we have the same value names inside each of them, as it makes copy-pasting easier, avoids getting muddled up through inconsistent names, and saves screen space in the NVR menu. Win-win-win, innit?
ShaderConst.LiftGammaGain.LiftGamma.x = lerp(
    TheSettingManager->GetSettingF("Shaders.SweetFXLiftGammaGain.Night", "LiftRed"),
    TheSettingManager->GetSettingF("Shaders.SweetFXLiftGammaGain.Day", "LiftRed"),
    isDayTime
);
Notice what we're doing here. In order to read the .toml file, we need to use TheSettingManager->GetSetting, with GetSetting being a prefix. Visual Studio will show you the different possible values we can read, but since we're dealing with floats (numbers with decimal places), we use GetSettingF() as seen above.
To write out that lerp in human language, we're doing:
Blend the following two values:
    SweetFXLiftGammaGain.Night's LiftRed setting
    SweetFXLiftGammaGain.Day's LiftRed setting
    By the current time of day
And put that number into the shader
Now we have to do this for all three sections' settings. Here is how the day and night sections should look:
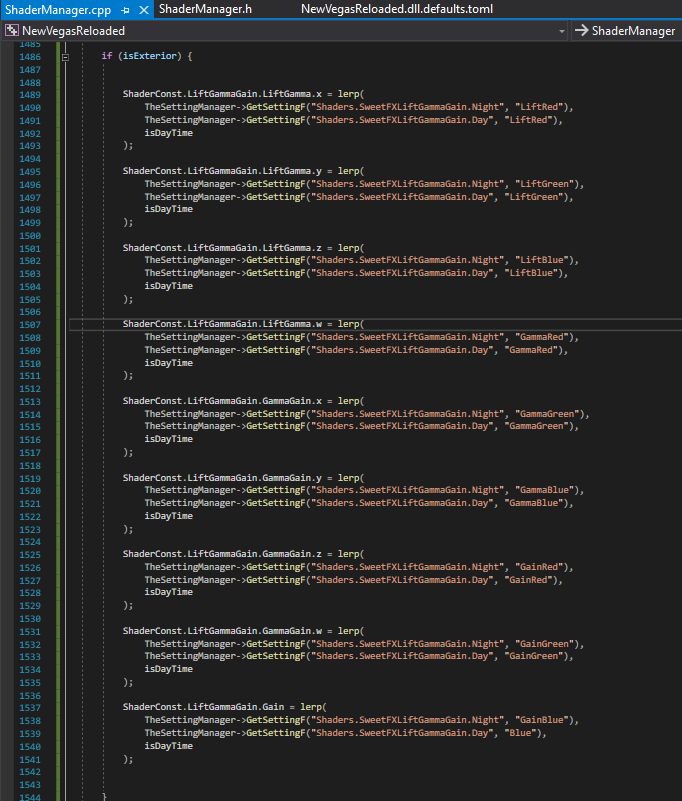
if (isExterior) {

    ShaderConst.LiftGammaGain.LiftGamma.x = lerp(
        TheSettingManager->GetSettingF("Shaders.SweetFXLiftGammaGain.Night", "LiftRed"),
        TheSettingManager->GetSettingF("Shaders.SweetFXLiftGammaGain.Day", "LiftRed"),
        isDayTime
    );

    ShaderConst.LiftGammaGain.LiftGamma.y = lerp(
        TheSettingManager->GetSettingF("Shaders.SweetFXLiftGammaGain.Night", "LiftGreen"),
        TheSettingManager->GetSettingF("Shaders.SweetFXLiftGammaGain.Day", "LiftGreen"),
        isDayTime
    );

    ShaderConst.LiftGammaGain.LiftGamma.z = lerp(
        TheSettingManager->GetSettingF("Shaders.SweetFXLiftGammaGain.Night", "LiftBlue"),
        TheSettingManager->GetSettingF("Shaders.SweetFXLiftGammaGain.Day", "LiftBlue"),
        isDayTime
    );

    ShaderConst.LiftGammaGain.LiftGamma.w = lerp(
        TheSettingManager->GetSettingF("Shaders.SweetFXLiftGammaGain.Night", "GammaRed"),
        TheSettingManager->GetSettingF("Shaders.SweetFXLiftGammaGain.Day", "GammaRed"),
        isDayTime
    );

    ShaderConst.LiftGammaGain.GammaGain.x = lerp(
        TheSettingManager->GetSettingF("Shaders.SweetFXLiftGammaGain.Night", "GammaGreen"),
        TheSettingManager->GetSettingF("Shaders.SweetFXLiftGammaGain.Day", "GammaGreen"),
        isDayTime
    );

    ShaderConst.LiftGammaGain.GammaGain.y = lerp(
        TheSettingManager->GetSettingF("Shaders.SweetFXLiftGammaGain.Night", "GammaBlue"),
        TheSettingManager->GetSettingF("Shaders.SweetFXLiftGammaGain.Day", "GammaBlue"),
        isDayTime
    );

    ShaderConst.LiftGammaGain.GammaGain.z = lerp(
        TheSettingManager->GetSettingF("Shaders.SweetFXLiftGammaGain.Night", "GainRed"),
        TheSettingManager->GetSettingF("Shaders.SweetFXLiftGammaGain.Day", "GainRed"),
        isDayTime
    );

    ShaderConst.LiftGammaGain.GammaGain.w = lerp(
        TheSettingManager->GetSettingF("Shaders.SweetFXLiftGammaGain.Night", "GainGreen"),
        TheSettingManager->GetSettingF("Shaders.SweetFXLiftGammaGain.Day", "GainGreen"),
        isDayTime
    );

    ShaderConst.LiftGammaGain.Gain = lerp(
        TheSettingManager->GetSettingF("Shaders.SweetFXLiftGammaGain.Night", "GainBlue"),
        TheSettingManager->GetSettingF("Shaders.SweetFXLiftGammaGain.Day", "Blue"),
        isDayTime
    );

}
else
{

}
Whew, that was intimidating right? Make sure you have the order correct, and you copy-pasted the right settings. That sure is fun to debug later on.
It isn't, by the way. It's soul destroying.
Now, luckily for the interior settings, we didn't add day/night separation. So we just need to do a single line for each setting:

else
{
    ShaderConst.LiftGammaGain.LiftGamma.x = TheSettingManager->GetSettingF("Shaders.SweetFXLiftGammaGain.Interior", "LiftRed");
    ShaderConst.LiftGammaGain.LiftGamma.y = TheSettingManager->GetSettingF("Shaders.SweetFXLiftGammaGain.Interior", "LiftGreen");
    ShaderConst.LiftGammaGain.LiftGamma.z = TheSettingManager->GetSettingF("Shaders.SweetFXLiftGammaGain.Interior", "LiftBlue");
    ShaderConst.LiftGammaGain.LiftGamma.w = TheSettingManager->GetSettingF("Shaders.SweetFXLiftGammaGain.Interior", "GammaRed");

    ShaderConst.LiftGammaGain.LiftGamma.x = TheSettingManager->GetSettingF("Shaders.SweetFXLiftGammaGain.Interior", "GammaGreen");
    ShaderConst.LiftGammaGain.LiftGamma.y = TheSettingManager->GetSettingF("Shaders.SweetFXLiftGammaGain.Interior", "GammaBlue");
    ShaderConst.LiftGammaGain.LiftGamma.z = TheSettingManager->GetSettingF("Shaders.SweetFXLiftGammaGain.Interior", "GainRed");
    ShaderConst.LiftGammaGain.LiftGamma.w = TheSettingManager->GetSettingF("Shaders.SweetFXLiftGammaGain.Interior", "GainGreen");

    ShaderConst.LiftGammaGain.Gain = TheSettingManager->GetSettingF("Shaders.SweetFXLiftGammaGain.Interior", "GainBlue");
}
Whew, we're done with that section of the code. I'll have to zoom out a bunch to show the result, so it's gonna be dinky-tiny, itty and unreasonably bitty. But it'll do.
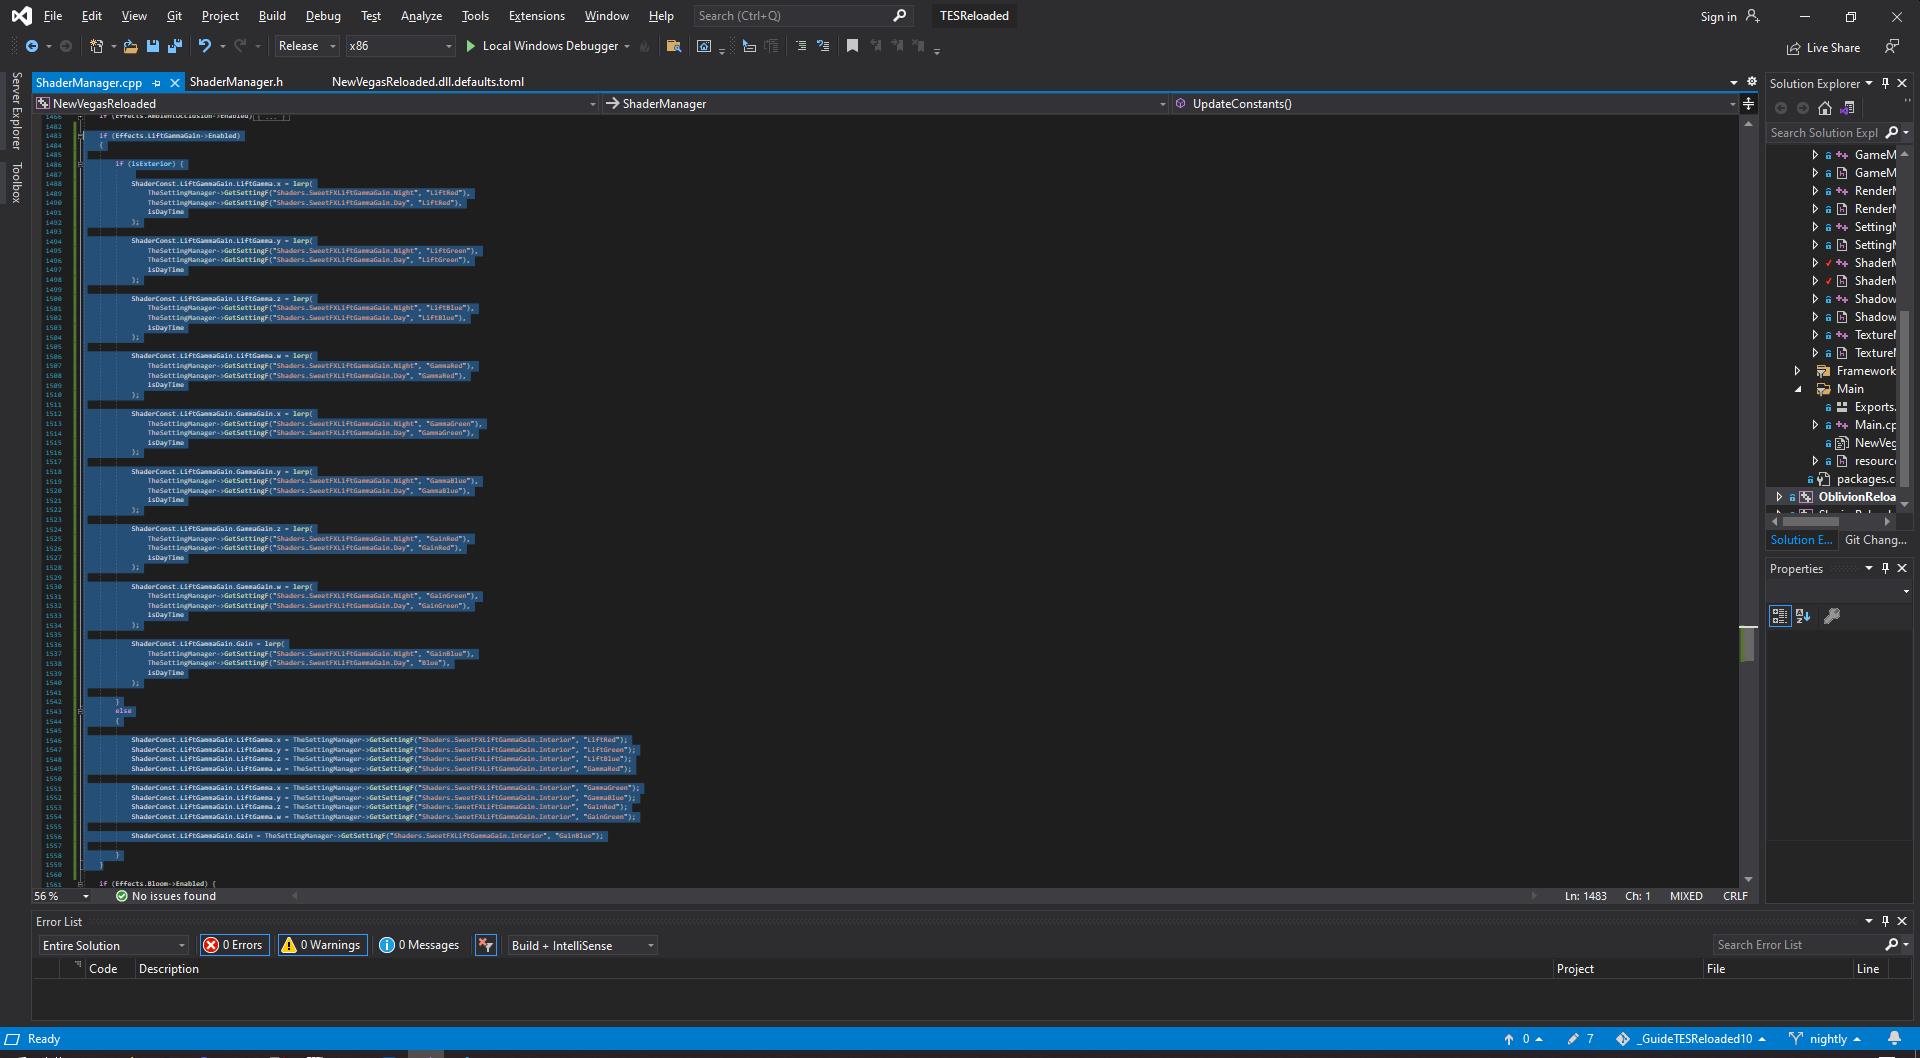
And here is the entire code block:
if (Effects.LiftGammaGain->Enabled)
{

  if (isExterior) {

    ShaderConst.LiftGammaGain.LiftGamma.x = lerp(
      TheSettingManager->GetSettingF("Shaders.SweetFXLiftGammaGain.Night", "LiftRed"),
      TheSettingManager->GetSettingF("Shaders.SweetFXLiftGammaGain.Day", "LiftRed"),
      isDayTime
    );

    ShaderConst.LiftGammaGain.LiftGamma.y = lerp(
      TheSettingManager->GetSettingF("Shaders.SweetFXLiftGammaGain.Night", "LiftGreen"),
      TheSettingManager->GetSettingF("Shaders.SweetFXLiftGammaGain.Day", "LiftGreen"),
      isDayTime
    );

    ShaderConst.LiftGammaGain.LiftGamma.z = lerp(
      TheSettingManager->GetSettingF("Shaders.SweetFXLiftGammaGain.Night", "LiftBlue"),
      TheSettingManager->GetSettingF("Shaders.SweetFXLiftGammaGain.Day", "LiftBlue"),
      isDayTime
    );

    ShaderConst.LiftGammaGain.LiftGamma.w = lerp(
      TheSettingManager->GetSettingF("Shaders.SweetFXLiftGammaGain.Night", "GammaRed"),
      TheSettingManager->GetSettingF("Shaders.SweetFXLiftGammaGain.Day", "GammaRed"),
      isDayTime
    );

    ShaderConst.LiftGammaGain.GammaGain.x = lerp(
      TheSettingManager->GetSettingF("Shaders.SweetFXLiftGammaGain.Night", "GammaGreen"),
      TheSettingManager->GetSettingF("Shaders.SweetFXLiftGammaGain.Day", "GammaGreen"),
      isDayTime
    );

    ShaderConst.LiftGammaGain.GammaGain.y = lerp(
      TheSettingManager->GetSettingF("Shaders.SweetFXLiftGammaGain.Night", "GammaBlue"),
      TheSettingManager->GetSettingF("Shaders.SweetFXLiftGammaGain.Day", "GammaBlue"),
      isDayTime
    );

    ShaderConst.LiftGammaGain.GammaGain.z = lerp(
      TheSettingManager->GetSettingF("Shaders.SweetFXLiftGammaGain.Night", "GainRed"),
      TheSettingManager->GetSettingF("Shaders.SweetFXLiftGammaGain.Day", "GainRed"),
      isDayTime
    );

    ShaderConst.LiftGammaGain.GammaGain.w = lerp(
      TheSettingManager->GetSettingF("Shaders.SweetFXLiftGammaGain.Night", "GainGreen"),
      TheSettingManager->GetSettingF("Shaders.SweetFXLiftGammaGain.Day", "GainGreen"),
      isDayTime
    );

    ShaderConst.LiftGammaGain.Gain = lerp(
      TheSettingManager->GetSettingF("Shaders.SweetFXLiftGammaGain.Night", "GainBlue"),
      TheSettingManager->GetSettingF("Shaders.SweetFXLiftGammaGain.Day", "Blue"),
      isDayTime
    );

  }
  else
  {

    ShaderConst.LiftGammaGain.LiftGamma.x = TheSettingManager->GetSettingF("Shaders.SweetFXLiftGammaGain.Interior", "LiftRed");
    ShaderConst.LiftGammaGain.LiftGamma.y = TheSettingManager->GetSettingF("Shaders.SweetFXLiftGammaGain.Interior", "LiftGreen");
    ShaderConst.LiftGammaGain.LiftGamma.z = TheSettingManager->GetSettingF("Shaders.SweetFXLiftGammaGain.Interior", "LiftBlue");
    ShaderConst.LiftGammaGain.LiftGamma.w = TheSettingManager->GetSettingF("Shaders.SweetFXLiftGammaGain.Interior", "GammaRed");

    ShaderConst.LiftGammaGain.LiftGamma.x = TheSettingManager->GetSettingF("Shaders.SweetFXLiftGammaGain.Interior", "GammaGreen");
    ShaderConst.LiftGammaGain.LiftGamma.y = TheSettingManager->GetSettingF("Shaders.SweetFXLiftGammaGain.Interior", "GammaBlue");
    ShaderConst.LiftGammaGain.LiftGamma.z = TheSettingManager->GetSettingF("Shaders.SweetFXLiftGammaGain.Interior", "GainRed");
    ShaderConst.LiftGammaGain.LiftGamma.w = TheSettingManager->GetSettingF("Shaders.SweetFXLiftGammaGain.Interior", "GainGreen");

    ShaderConst.LiftGammaGain.Gain = TheSettingManager->GetSettingF("Shaders.SweetFXLiftGammaGain.Interior", "GainBlue");

  }
}